硬碟隨身碟加密-VeraCrypt軟體教學
出自KMU Wiki
(修訂版本間差異)
| 在2020年6月4日 (四) 08:14所做的修訂版本 (編輯) Ykk (對話 | 貢獻) 小 (硬碟加密-VeraCrypt軟體教學移動到硬碟資料夾加密-VeraCrypt軟體教學) ←上一個 |
當前修訂版本 (2020年6月8日 (一) 15:17) (編輯) (撤銷) Ykk (對話 | 貢獻) |
||
| (22個中途的修訂版本沒有顯示。) | |||
| 第1行: | 第1行: | ||
| + | == 前置準備 == | ||
| + | <br/> | ||
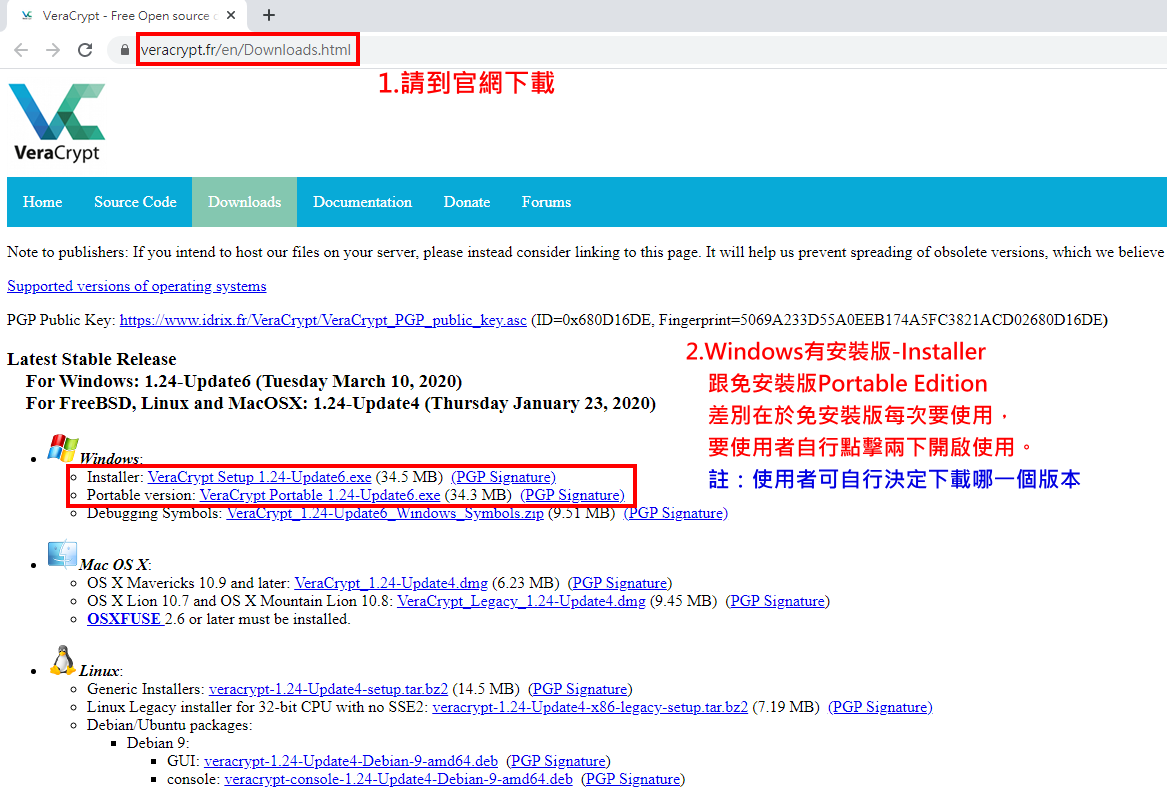
| + | :1.請至[https://www.veracrypt.fr/en/Downloads.html VeraCrypte官網]進行下載,此為免費開源軟體 | ||
| + | <br/> | ||
| + | :2.此軟體有免安裝版本,如有需要,可自行選擇下載使用。 | ||
| + | : [[Image:vera_pre.png]] | ||
| + | <br/> | ||
| + | :3.以下教學使用Windows 10 作業系統為範例,使用版本為 For Windows, | ||
| + | : [https://owncloud.kmu.edu.tw/public.php?service=files&t=6906097314971956bcd425cb93dd1fdf&download Portable version: VeraCrypt Portable 1.24-Update6.exe] (Tuesday March 10, 2020) | ||
| + | <br/> | ||
| + | : <font color="red">註:此軟體不同於BitLocker僅能於Windows使用,此軟體支援macOS,Windows,Linux等</font> | ||
| - | + | == 如何使用加密功能 == | |
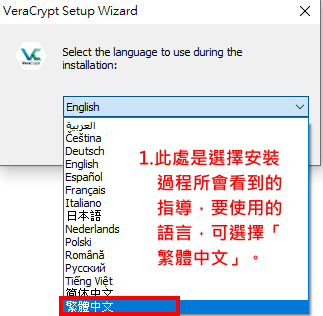
| + | :1.點擊下載的檔案,會跳出以下畫面,此處語言是選擇安裝過程 | ||
| + | : 所會看到的指導,要使用的語言,可選擇<font color="red">「繁體中文」</font>。 | ||
| + | ::[[Image:vera_01.png]] | ||
| + | <br/> | ||
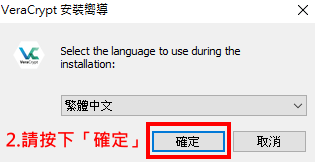
| + | :2.請按下<font color="red">「確定」</font>: | ||
| + | ::[[Image:vera_02.png]] | ||
| + | <br/> | ||
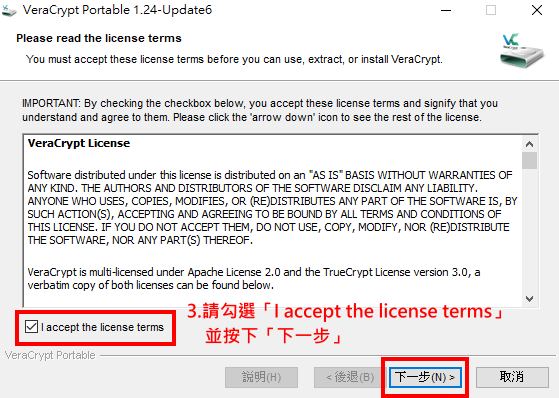
| + | :3.請勾選<font color="red">「I accept the license terms」</font>,並按下<font color="red">「下一步」</font>: | ||
| + | ::[[Image:vera_03.png]] | ||
| + | <br/> | ||
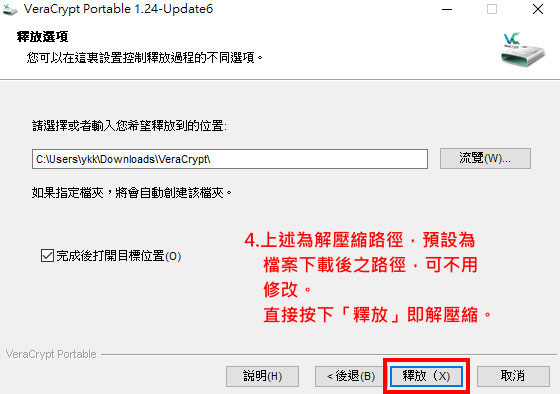
| + | :4.上述為解壓縮路徑,預設為檔案下載後之路徑,<font color="red">可不用修改</font>。 | ||
| + | : 直接按下<font color="red">「釋放」</font>即解壓縮。: | ||
| + | ::[[Image:vera_04.png]] | ||
| + | <br/> | ||
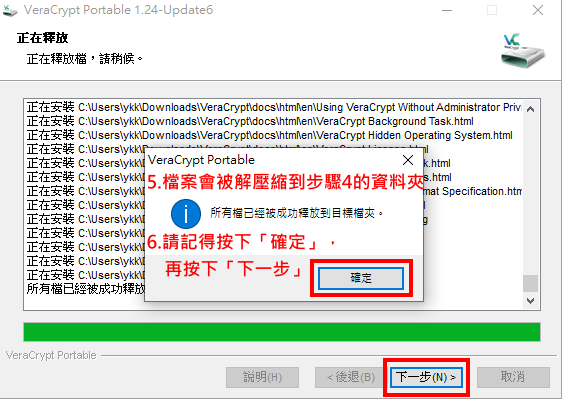
| + | :5.檔案會被解壓縮到步驟4的資料夾。請記得按下<font color="red">「確定」</font>, 再按下<font color="red">「下一步」</font> | ||
| + | ::[[Image:vera_05.png]] | ||
| + | <br/> | ||
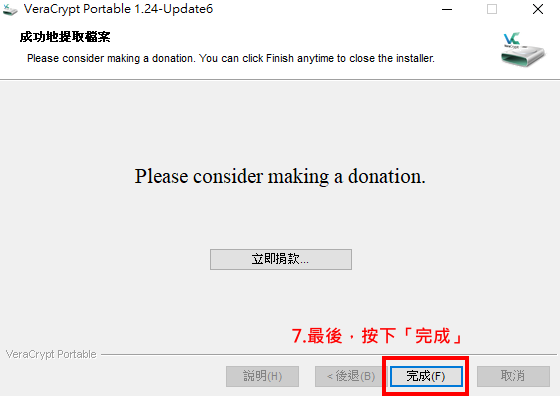
| + | :6.最後,按下<font color="red">「完成」</font>,程式即可解壓縮。 | ||
| + | ::[[Image:vera_06.png]] | ||
| + | <br/> | ||
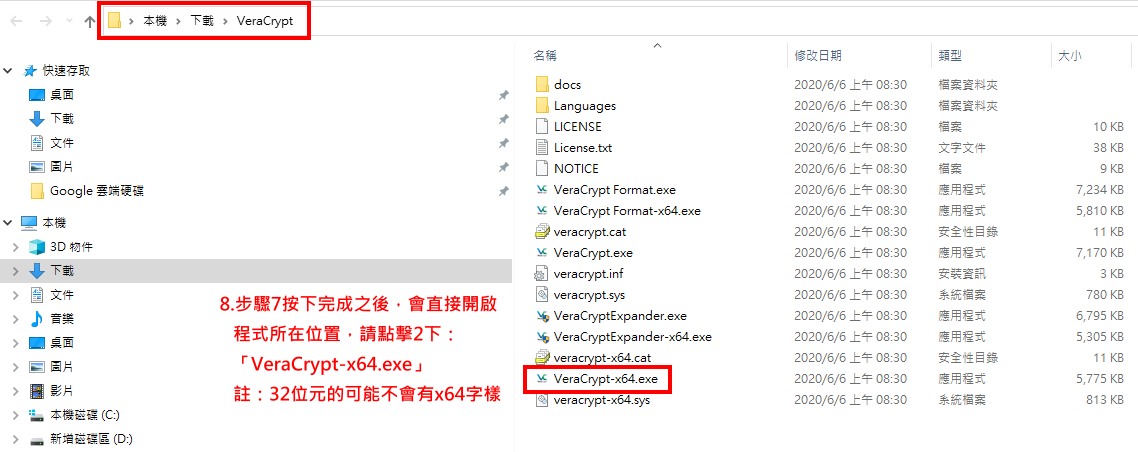
| + | :7.上一步驟按下<font color="red">「完成」</font>之後,會<font color="red">「直接開啟程式所在位置</font> | ||
| + | : ,請點擊2下:<font color="red">「VeraCrypt-x64.exe」</font> | ||
| + | : 註:32位元的可能不會有x64字樣 | ||
| + | ::[[Image:vera_07.png]] | ||
| + | <br/> | ||
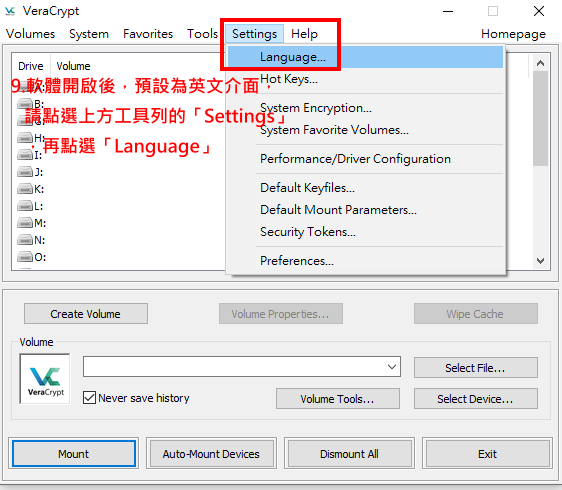
| + | :9.軟體開啟後,預設為英文介面,請點選上方工具列的<font color="red">「Settings」</font>,再點選<font color="red">「Language」</font>。 | ||
| + | ::[[Image:vera_08.png]] | ||
| + | <br/> | ||
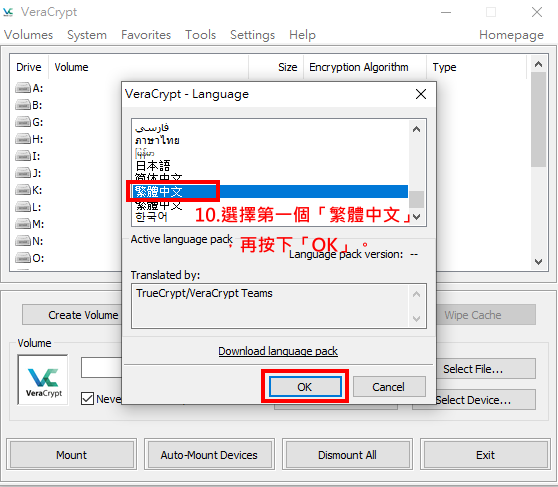
| + | :10.選擇第一個<font color="red">「繁體中文」</font>,再按下<font color="red">「OK」</font>。 | ||
| + | ::[[Image:vera_09.png]] | ||
| + | <br/> | ||
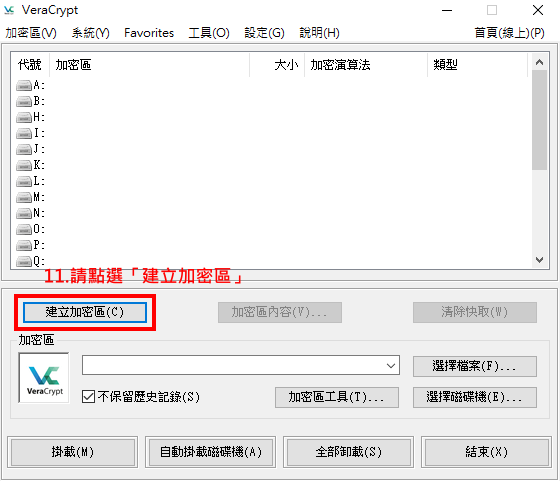
| + | :11.回到軟體操作介面,請點選<font color="red">「建立加密區」</font>。 | ||
| + | ::[[Image:vera_10.png]] | ||
| + | <br/> | ||
| + | :12.請點選<font color="red">「加密非系統分區/驅動器」</font>,之後點選<font color="red">「下一步」</font>。 | ||
| + | : 加密區類型,請點選<font color="red">「標準VeraCrypt加密區」</font>,之後點選<font color="red">「下一步」</font> | ||
| + | ::[[Image:vera_11.png]] | ||
| + | <br/> | ||
| + | :13.請點選紅框處的<font color="red">「選擇磁碟機」</font>,確認選到<font color="red">「可移除式磁碟」</font>的正確隨身碟。,之後點選<font color="red">「確定」</font>。 | ||
| + | : 確認磁碟機路徑無誤後,點選<font color="red">「下一步」</font> | ||
| + | ::[[Image:vera_12.png]] | ||
| + | <br/> | ||
| + | :14.(1)若為新隨身碟,請選<font color="red">「創建加密並對其格式化」</font>(2)本處<font color="red">以隨身碟中已有檔案做示範</font>,請點選 | ||
| + | : <font color="red">「Encrypt partition inplace」</font>。(3)最後點選<font color="red">「下一步」</font> | ||
| + | :15.此處是再次詢問,確認要對此磁碟加密嗎,是否有保留相關備份等問題,若確定, | ||
| + | : 請按下<font color="red">「是」</font>,再點選<font color="red">「下一步」</font> | ||
| + | ::[[Image:vera_13.png]] | ||
| + | <br/> | ||
| + | :16.此處是選擇要使用的加密演算法,建議使用預設<font color="red">「AES」</font>即可。確認後請點選<font color="red">「下一步」</font>。 | ||
| + | : 輸入要使用的密碼,預設之密碼規則過於複雜,建議<font color="red">包含(1)大小寫字母(2)符號(3)數字, | ||
| + | : 並在8碼以內即可</font>,最後,再點選<font color="red">「下一步」</font>。 | ||
| + | ::[[Image:vera_14.png]] | ||
| + | <br/> | ||
| + | :17.按下<font color="red">「下一步」後,基本上若設定之密碼沒有超過20字元</font>,均會有此視窗,請直接按下<font color="red">「是」</font>。 | ||
| + | : 請在<font color="red">此圖紅框區域內,隨意點擊滑鼠左鍵,增加加密強度</font>,直到下一步驟再按下<font color="red">「下一步」</font> | ||
| + | ::[[Image:vera_15.png]] | ||
| + | <br/> | ||
| + | :18.當<font color="red">點擊上方區塊,直到下方進度條呈現綠色</font>,請點選<font color="red">「下一步」</font>。 | ||
| + | : 右側圖請直接選擇<font color="red">「無(最快)」</font>,再點選<font color="red">「下一步」</font>。 | ||
| + | ::[[Image:vera_16.png]] | ||
| + | <br/> | ||
| + | :19.此視窗,請直接點選<font color="red">「加密」</font>,來開始對隨身碟進行加密。 | ||
| + | : 此處是<font color="red">告知加密過程中,請不要任意拔除隨身碟,,若同意, 請按下「是」</font>。 | ||
| + | ::[[Image:vera_17.png]] | ||
| + | <br/> | ||
| + | :20.此處可看到<font color="red">「加密」呈現反灰色</font>,表示正在進行,加密速度與: | ||
| + | : <font color="red">(1)CPU處理速度(2)加密隨身碟容量大小有關</font>。 | ||
| + | : 右圖是說明後續如何使用此加密隨身碟,後續亦會有操作步驟,進行教學,請按下<font color="red">「確定」</font>。 | ||
| + | ::[[Image:vera_18.png]] | ||
| + | <br/> | ||
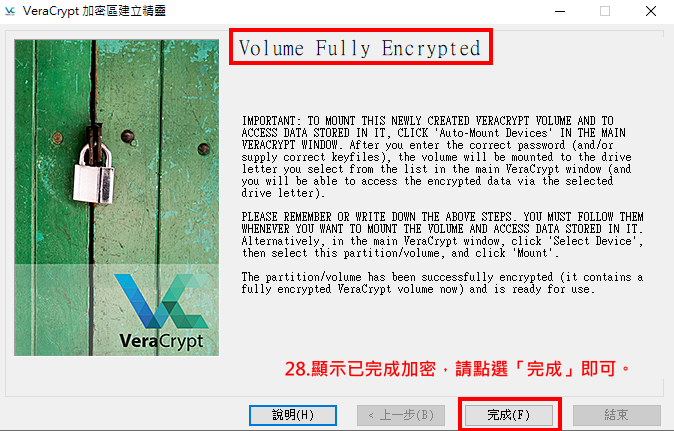
| + | :21.顯示已完成加密,請點選<font color="red">「完成」</font>即可。。 | ||
| + | ::[[Image:vera_19.png]] | ||
| + | |||
| + | == 如何使用加密後之硬碟或隨身碟 == | ||
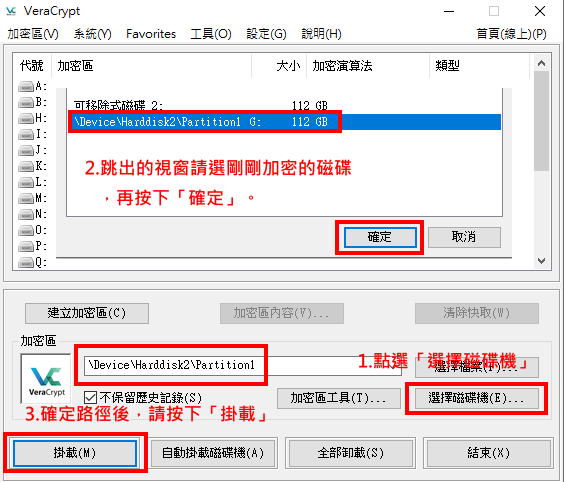
| + | :1.點選<font color="red">「選擇磁碟機」</font>。 | ||
| + | :2.跳出的視窗<font color="red">請選剛剛加密的磁碟,再按下「確定」</font>。 | ||
| + | :3.確定路徑後,請按下<font color="red">「掛載」</font>。 | ||
| + | ::[[Image:vera_20.png]] | ||
| + | <br/> | ||
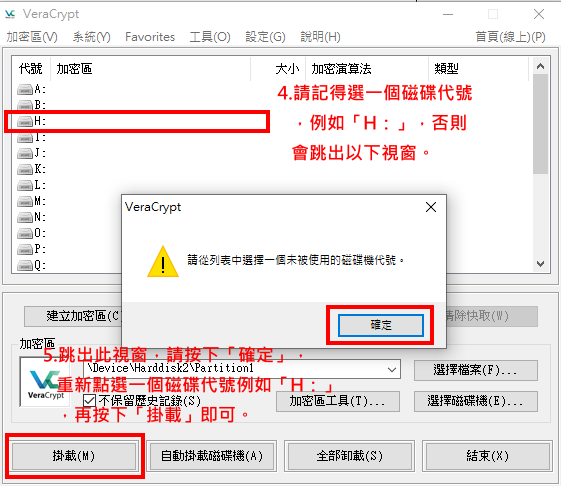
| + | :4.請記得<font color="red">選一個磁碟代號 ,例如「H:」</font>,否則會跳出以下視窗。 | ||
| + | :5.跳出此視窗,<font color="red">請按下「確定」,重新點選一個磁碟代號例如「H:」 ,再按下「掛載」</font>即可。 | ||
| + | ::[[Image:vera_21.png]] | ||
| + | <br/> | ||
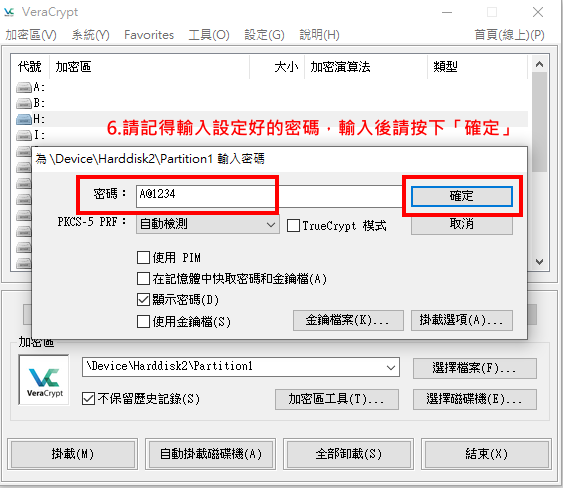
| + | :6.請記得<font color="red">輸入設定好的密碼,輸入後請按下「確定」</font>。 | ||
| + | ::[[Image:vera_22.png]] | ||
| + | <br/> | ||
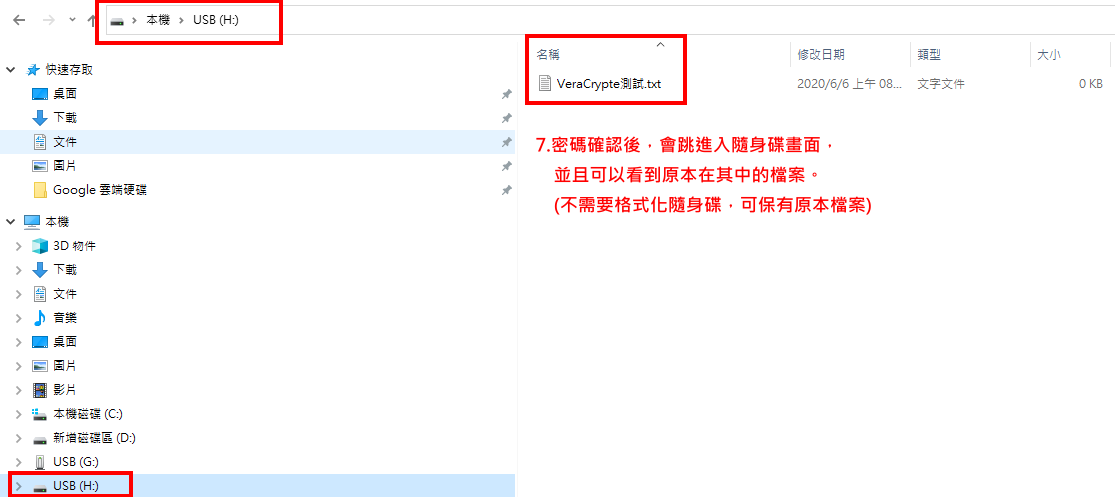
| + | :7.密碼確認後,會跳進入隨身碟畫面,並且可以看到原本在其中的檔案。 | ||
| + | : <font color="red">(不需要格式化隨身碟,可保有原本檔案)</font>。 | ||
| + | ::[[Image:vera_23.png]] | ||
| + | <br/> | ||
| + | :8.點擊原本掛載的G槽,會顯示「請將USB(G:)」。表示已加密,<font color="red">要使用自己設定的H槽</font>。 | ||
| + | ::[[Image:vera_24.png]] | ||
| + | <br/> | ||
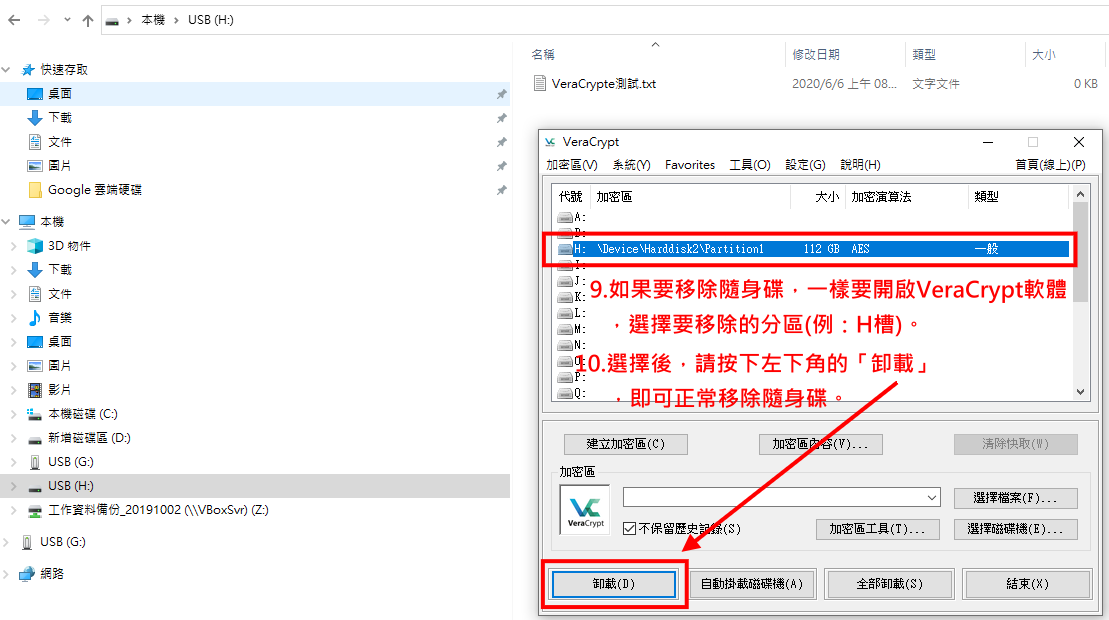
| + | :9.如果要移除隨身碟,<font color="red">一樣要開啟VeraCrypt軟體,選擇要移除的分區(例:H槽)</font>。 | ||
| + | : <font color="red">選擇後,請按下左下角的「卸載」,即可正常移除隨身碟。</font>。 | ||
| + | ::[[Image:vera_25.png]] | ||
| + | <br/> | ||
| + | == 如何解除VeraCrypt功能 == | ||
| + | |||
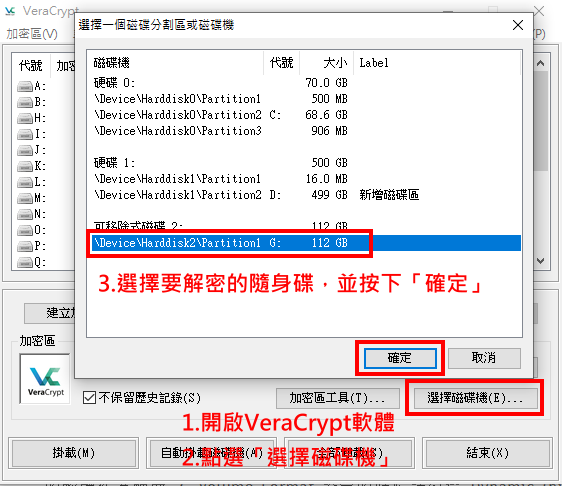
| + | :1.開啟VeraCrypt軟體,點選<font color="red">「選擇磁碟機」</font>。 | ||
| + | : 選擇要解密的隨身碟,並按下<font color="red">「確定」</font>。 | ||
| + | ::[[Image:vera_26.png]] | ||
| + | <br/> | ||
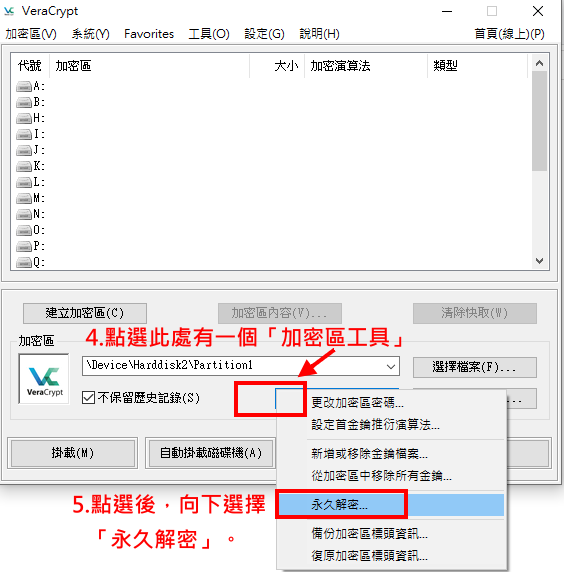
| + | :2.點選此處有一個<font color="red">「加密區工具」</font>,點選後,向下選擇<font color="red">「永久解密」</font>。 | ||
| + | ::[[Image:vera_27.png]] | ||
| + | <br/> | ||
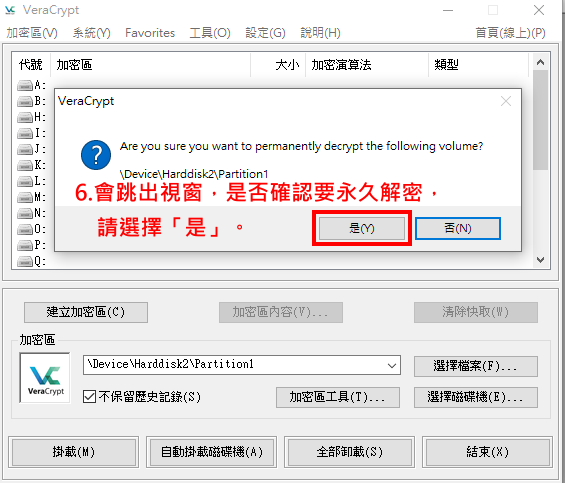
| + | :3.會跳出視窗,是否確認要永久解密,請選擇<font color="red">「是」</font>。 | ||
| + | ::[[Image:vera_28.png]] | ||
| + | <br/> | ||
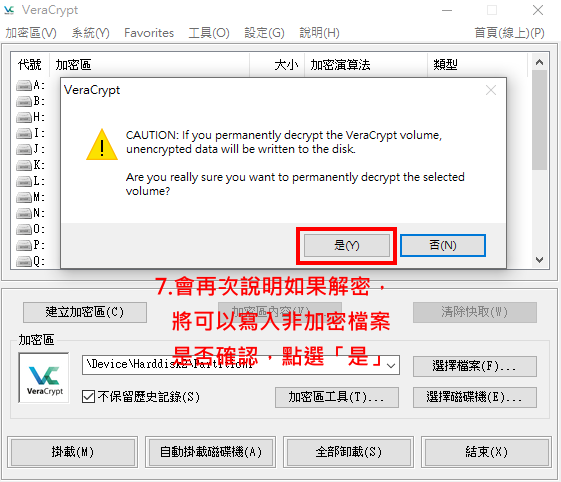
| + | :4.會再次說明如果解密,將可以寫入非加密檔案是否確認,點選<font color="red">「是」</font>。 | ||
| + | ::[[Image:vera_29.png]] | ||
| + | <br/> | ||
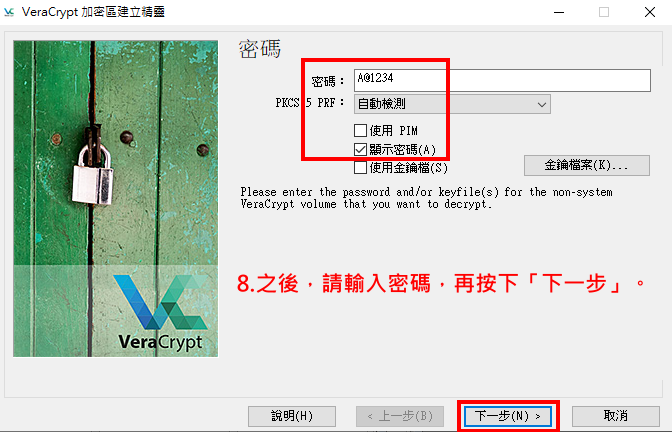
| + | :5.之後,請輸入密碼,再按下<font color="red">「下一步」</font>。 | ||
| + | ::[[Image:vera_30.png]] | ||
| + | <br/> | ||
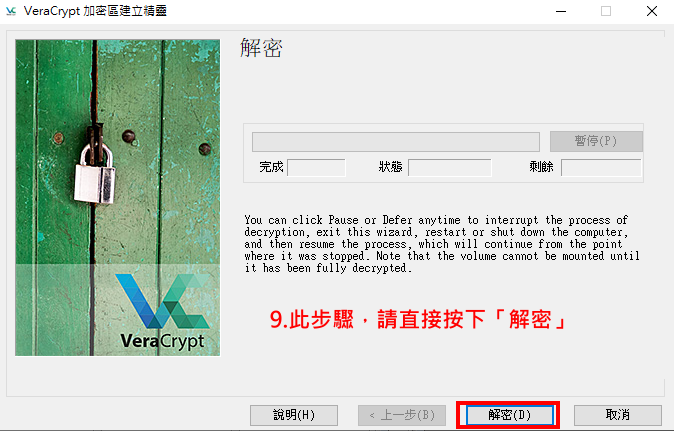
| + | :7.此步驟,請直接按下<font color="red">「解密」</font>。 | ||
| + | ::[[Image:vera_31.png]] | ||
| + | <br/> | ||
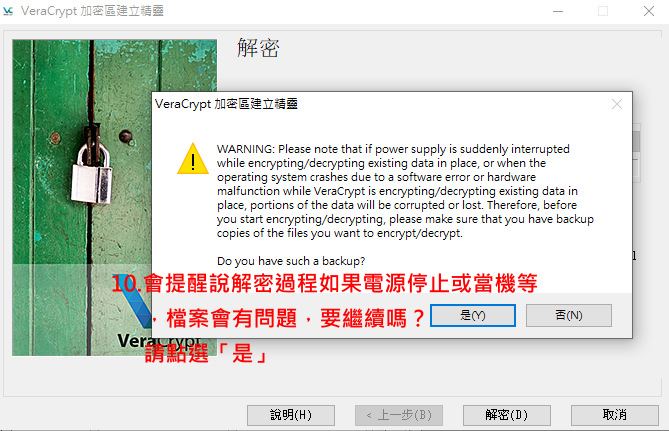
| + | :8.會提醒說解密過程如果電源停止或當機等,檔案會有問題,要繼續嗎? 請點選<font color="red">「是」</font>。 | ||
| + | ::[[Image:vera_32.png]] | ||
| + | <br/> | ||
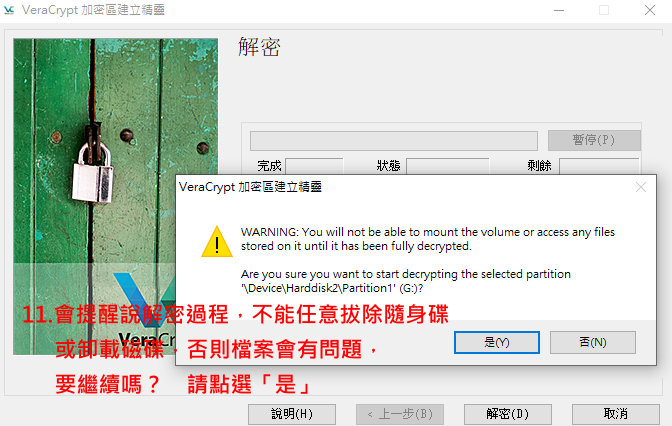
| + | :9.會提醒說解密過程,不能任意拔除隨身碟或卸載磁碟,否則檔案會有問題,要繼續嗎?請點選<font color="red">「是」</font>。 | ||
| + | ::[[Image:vera_33.png]] | ||
| + | <br/> | ||
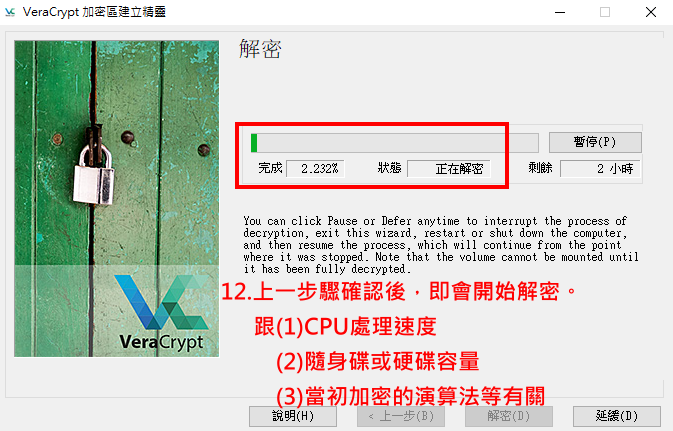
| + | :10.上一步驟確認後,即會開始解密,解密速度: | ||
| + | : 跟<font color="red">(1)CPU處理速度。(2)隨身碟或硬碟容量。(3)當初加密的演算法等有關</font>。 | ||
| + | ::[[Image:vera_34.png]] | ||
| + | <br/> | ||
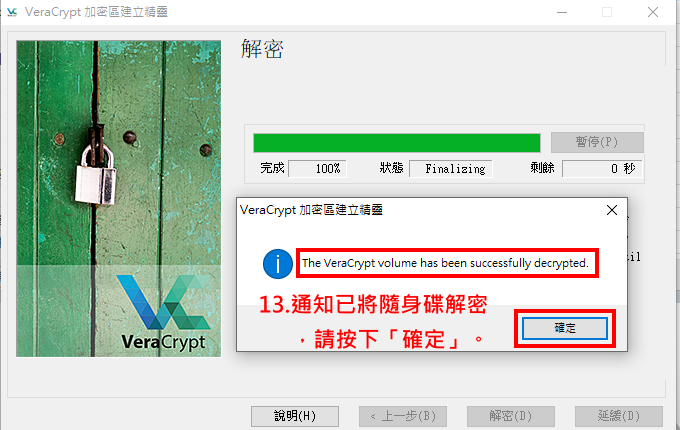
| + | :11.通知已將隨身碟解密,請按下<font color="red">「確定」</font>。 | ||
| + | ::[[Image:vera_35.png]] | ||
| + | <br/> | ||
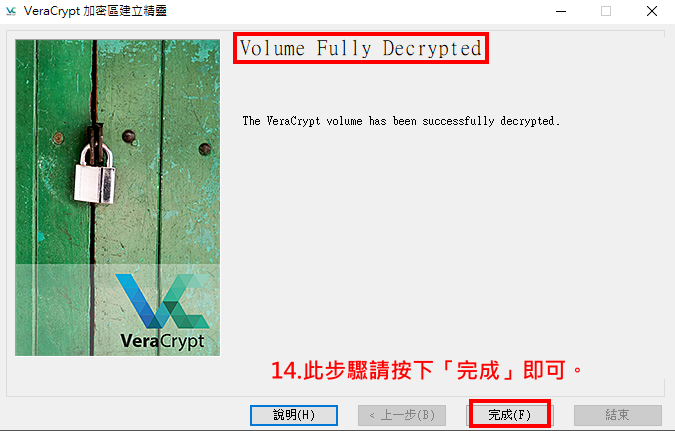
| + | :12.此步驟請按下<font color="red">「完成」即可</font>。 | ||
| + | ::[[Image:vera_36.png]] | ||
| + | <br/> | ||
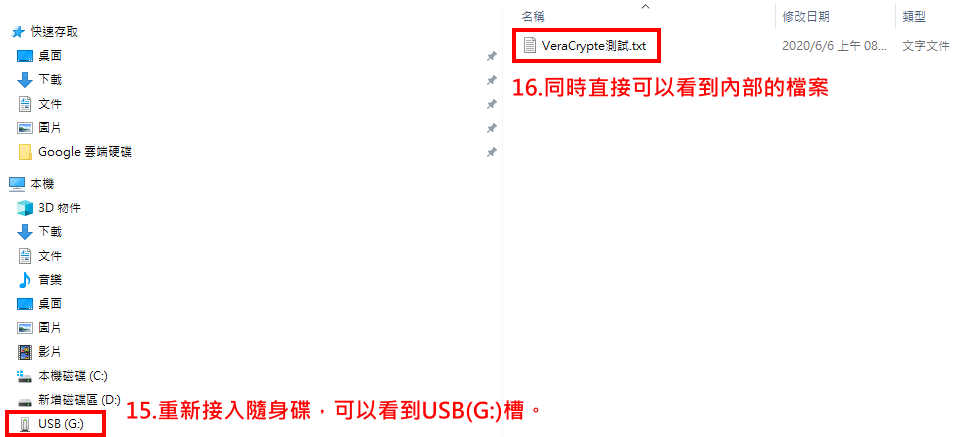
| + | :13.<font color="red">重新接入隨身碟,可以看到USB(G:)槽</font>。 | ||
| + | : 同時直接可以看到內部的檔案。 | ||
| + | ::[[Image:vera_37.png]] | ||
| + | <br/> | ||
| [[Category:資訊處]] [[Category:圖書資訊處]] [[Category:資訊服務]] | [[Category:資訊處]] [[Category:圖書資訊處]] [[Category:資訊服務]] | ||
當前修訂版本
目錄 |
[編輯] 前置準備
- 1.請至VeraCrypte官網進行下載,此為免費開源軟體
- 3.以下教學使用Windows 10 作業系統為範例,使用版本為 For Windows,
- Portable version: VeraCrypt Portable 1.24-Update6.exe (Tuesday March 10, 2020)
- 註:此軟體不同於BitLocker僅能於Windows使用,此軟體支援macOS,Windows,Linux等
[編輯] 如何使用加密功能
- 14.(1)若為新隨身碟,請選「創建加密並對其格式化」(2)本處以隨身碟中已有檔案做示範,請點選
- 「Encrypt partition inplace」。(3)最後點選「下一步」
- 15.此處是再次詢問,確認要對此磁碟加密嗎,是否有保留相關備份等問題,若確定,
- 請按下「是」,再點選「下一步」
- 16.此處是選擇要使用的加密演算法,建議使用預設「AES」即可。確認後請點選「下一步」。
- 輸入要使用的密碼,預設之密碼規則過於複雜,建議包含(1)大小寫字母(2)符號(3)數字,
- 並在8碼以內即可,最後,再點選「下一步」。
[編輯] 如何使用加密後之硬碟或隨身碟
[編輯] 如何解除VeraCrypt功能
